Modern Swift Testing: The Complete Guide - 1
Learn Swift Testing from scratch: the @Test and #expect macros, test doubles, parameterised tests, tags, XCTestPlan for CI lanes, and actor isolation.
Introduction
TL;DR: In this article, we will explore the fundamentals of Swift Testing, its key features, and practical ways to use it in your iOS projects. Before diving in, a bit of background will help you understand why things are designed the way they are.
You can skip straight to the Swift Testing section if you just want the framework itself.
As developers, we write code. But humans are prone to error, and no amount of careful typing prevents logic bugs from sneaking in. Test cases are how we catch those errors early, before they reach production.
Think of tests as a safety net. If you are tasked with refactoring a critical payment component, how do you make sure your changes do not break existing behaviour? You write tests that describe what the code is supposed to do, then run them after every change. If something breaks, you know immediately, rather than hearing about it from users.
Beyond catching bugs, good tests tell a story. They document the use case of a class or component, capturing a snapshot of your intended logic. Six months from now, when you need to make a change and can no longer remember why a specific condition exists, those tests will be your documentation.
For years, iOS developers relied on XCTest. Some teams also reached for Quick and Nimble, a pair of libraries that bring BDD (Behaviour-Driven Development) to Swift with a more expressive, English-like API. Both got the job done, but they came with boilerplate and limitations that felt increasingly out of place in modern Swift.
With Xcode 16, Apple shipped a next-generation testing framework built specifically for Swift, Swift Testing. It is leaner, more expressive, and takes full advantage of modern Swift language features like macros and structured concurrency, with first-class support for things like parameterised tests (though it can be an anti pattern). It is also part of the open-source Swift project, so it works on Linux too, not just Apple platforms.
The Martin Fowler Test Pyramid
In 2012, Martin Fowler wrote what became the definitive reference on the Test Pyramid, a concept originally described by Mike Cohn in his 2009 book Succeeding with Agile.
The idea is straightforward. Picture a pyramid with three layers:
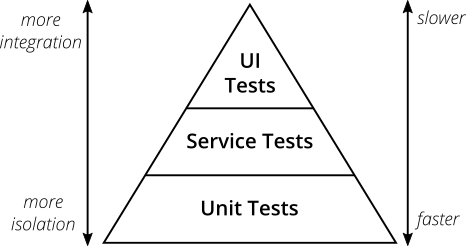
- Unit Tests at the base, wide and numerous
- Integration/Service Tests in the middle
- End-to-End/UI Tests at the top, narrow and few
The pyramid shape is intentional. Unit tests are fast, cheap to write, and easy to maintain, so you write a lot of them. E2E tests are slow, brittle due to several uncontrollable factors and expensive to maintain, so you write as few as necessary.
The key insight from Fowler’s model is that most of your tests should live at the bottom of the pyramid. A suite dominated by UI tests is slow, flaky, and gives you poor debugging information when something fails. A suite dominated by unit tests is fast, reliable, and points you directly at the line that broke.
This is the practical reasoning behind “write more unit tests.” It is not just a best practice slogan. It is a strategy for keeping your feedback loop fast as your codebase grows.
With that strategy picture in mind, let’s look more closely at what a good unit test actually looks like.
The Unit Test
A unit test exercises one small, isolated piece of behaviour in your code. A “unit” is typically a single function or a small class, tested in complete isolation from its dependencies.
I will convince you why UTs have the highest ROI with three reasons:
- Speed Speed Speed! A unit test runs in milliseconds. You can run hundreds of them in the time it takes a single UI test to launch the simulator. I will show you some tricks to enhance your unit test’s speed in this article.
- Isolation. Because you control the inputs and replace dependencies with fakes, you can test edge cases that are nearly impossible to reproduce in a real running app.
- Stability. Unit tests are scoped under specific condition, and they pass or fail based on logic alone.
With AI coding tools, unit tests become more relevant, not less. For every bug you encounter, resist the urge to ask the AI to just fix it. Instead, ask it to first reproduce the problem with a failing test case. Only once that test is in place, ask it to fix the bug, then run the test again to confirm. This workflow keeps the AI focused, reduces the risk of it touching unrelated code, and leaves you with a test that documents exactly what went wrong. Over time, your test suite becomes a precise record of every edge case your code handles and every mistake you made along the way.
To write truly isolated unit tests, though, you need a way to control the dependencies your code talks to. That is where our next section, test doubles come in.
Test Doubles
When writing unit tests, you often need to replace real dependencies with controlled substitutes. These substitutes are called test doubles, a term coined by Gerard Meszaros in xUnit Test Patterns. Before we move any further, let me get the naming straight so that you won’t confuse later in this article series.
You may have heard of the word “mock” quite often. It is used as a catch-all in everyday conversation, but there are actually several distinct types of test doubles, each with a different purpose.
Stub
A stub returns a pre-configured response to a call. It does not verify how many times it was called or with what arguments. Use a stub when you need the dependency to return a specific value so you can test how your code reacts to it.
struct StubNetworkService: NetworkServiceProtocol {
    func fetchUser(id: String) async throws -> User {
        User(id: "test-id", name: "Test User")
    }
}
Spy
A spy records the calls made to it so you can assert on behaviour after the fact. Use a spy when you need to verify that a function was called, how many times it was called, or with what arguments it was called.
class SpyAnalytics: AnalyticsProtocol {
    private(set) var trackedEvents: [String] = []

    func track(event: String) {
        trackedEvents.append(event)
    }
}
Notice the spy is a class, not a struct. Tests need to observe mutations that happen inside the code under test, which requires reference semantics. A struct would be copied on assignment, so your trackedEvents array would always appear empty from the test’s perspective.
Mock
A mock is pre-programmed with expectations and verifies those expectations, usually with an explicit assertion at the end of the test. In Swift, there is no built-in auto-verification, so a mock typically looks like a spy with added assertion logic. The line between the two is often blurred, and many developers use the word “mock” to cover both. The important distinction is intent: a mock asserts, while a spy just records.
Fake
A fake is a working implementation that takes shortcuts that are unsuitable for production. The most common example is an in-memory store used in tests instead of a real database.
class FakeUserRepository: UserRepositoryProtocol {
    private var store: [String: User] = [:]

    func save(_ user: User) {
        store[user.id] = user
    }

    func find(id: String) -> User? {
        store[id]
    }
}
Fixture
A fixture is not a substitute for a dependency, it is the pre-built state your test starts from. Think of it as the “arrange” step extracted and shared. Instead of constructing the same User object or populating the same database rows in every test, you define a fixture once and reuse it.
In Swift, fixtures are typically plain factory methods or static properties on a helper type:
extension User {
    static var fixture: User {
        User(id: "fixture-id", name: "Ada Lovelace", role: .admin)
    }

    static func fixture(role: Role) -> User {
        User(id: "fixture-id", name: "Ada Lovelace", role: role)
    }
}
Then in any test:
let user = User.fixture
let adminUser = User.fixture(role: .admin)
Fixtures keep tests readable because the setup noise disappears. A test that starts with let user = User.fixture immediately tells the reader that the specific user details do not matter for this test, only the behaviour being verified does.
Given, When, Then
My favourite way, and arguably the iOS community’s favourite way, to structure a unit test is the Given, When, Then format. You may also see it called Arrange, Act, Assert (AAA) in other ecosystems. The names differ but the idea is exactly the same.
Every test is responsible for exactly three steps:
- Given — what is the starting state? (Arrange your fixtures and doubles)
- When — what action triggers the behaviour you want to test? (Act)
- Then — what should be true afterwards? (Assert)
Here is how GWT maps to a real Swift Testing test:
@Test("Adding two numbers returns the correct sum")
func addingTwoNumbers() {
    // Given
    let calculator = Calculator()

    // When
    let result = calculator.add(2, 3)

    // Then
    #expect(result == 5)
}
You will notice @Test and #expect above. Those are two of the core primitives in Swift Testing. Let’s dig into all of them, one by one.
Swift Testing
Swift Testing shipped with Xcode 16 and is built into the Swift open-source toolchain. You do not install it as a package. Inside Xcode, when you add a new test target, you can choose “Swift Testing” directly.
It lives in the Testing module, so your test files start with:
import TestingThat single import gives you access to every macro, trait, and API covered in this article.
Swift Testing works alongside XCTest, not against it. You can mix both in the same target. Old XCTest tests keep running exactly as before, so you can migrate gradually.
The @Test Macro
@Test is the entry point for every test in Swift Testing. You attach it to any function, and Swift Testing discovers and runs it automatically.
@Test
func userCanLogin() async throws {
    // test body
}
Unlike XCTest, there is no requirement to:
- Subclass
XCTestCase - Prefix every function with
test
Display Names
By default, Swift Testing derives a human-readable name from your function name. userCanLogin becomes “userCanLogin”. But you can override it with a string:
@Test("User receives a welcome email after sign-up")
func userCanLogin() async throws { ... }
Display names show up in Xcode’s test navigator and in CI output. Use them when the function name alone does not capture the full intent.

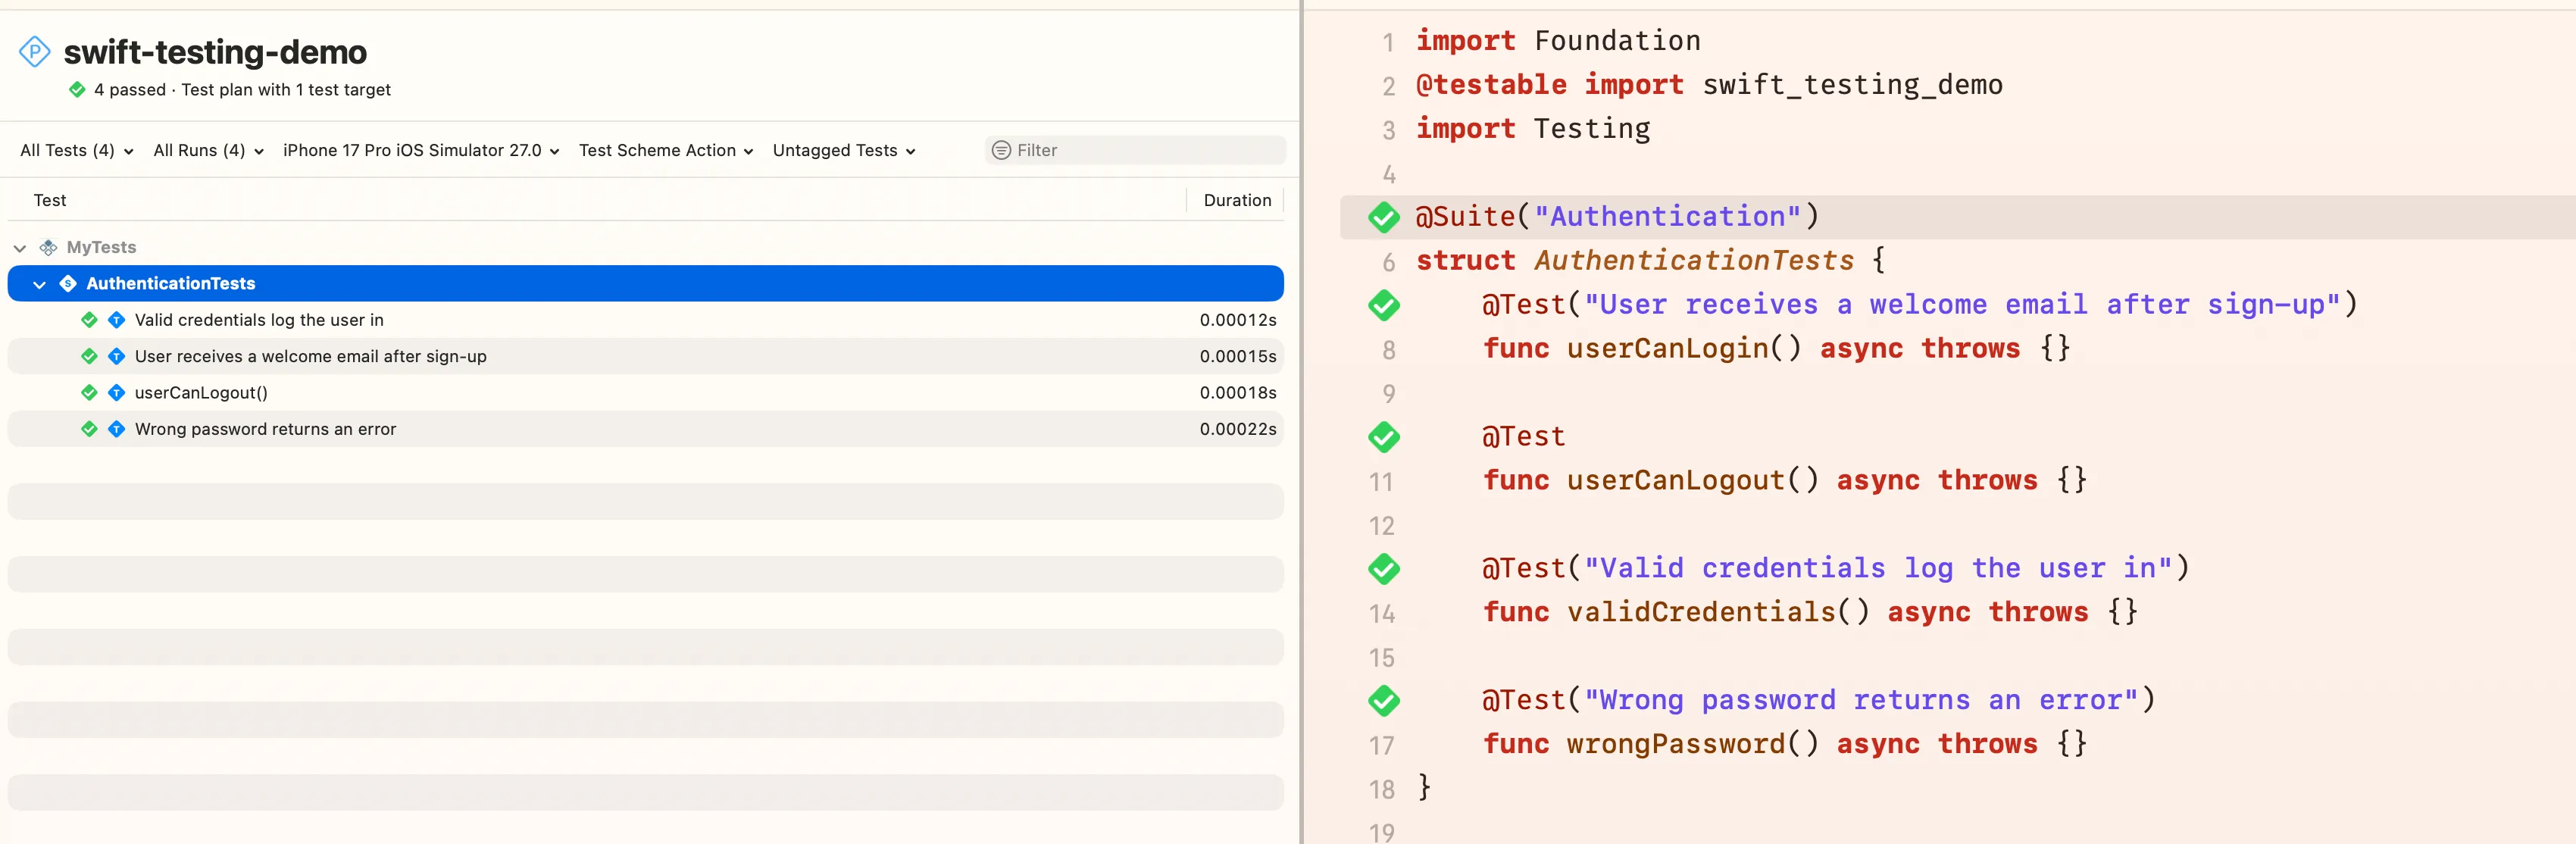
@Test Inside a Type
You can group related tests by putting @Test functions inside a struct or class. No base class needed:
struct AuthenticationTests {
    @Test("Valid credentials log the user in")
    func validCredentials() { ... }

    @Test("Wrong password returns an error")
    func wrongPassword() { ... }
}
Swift Testing treats the containing type as a test suite automatically. Each @Test function gets its own fresh instance of the struct, so there is no shared state between tests by default.
The @Suite Macro
@Suite is the explicit way to mark a type as a test suite. It is optional when you only want to group @Test functions, but it becomes essential when you want to attach traits to the entire group.
@Suite("Authentication")
struct AuthenticationTests {
    @Test func validCredentials() { ... }
    @Test func invalidCredentials() { ... }
}
@Suite accepts the same traits as @Test, so you can apply conditions, tags, or time limits to an entire suite at once (more on that in the Traits section). Any trait applied to @Suite is inherited by every test inside it.
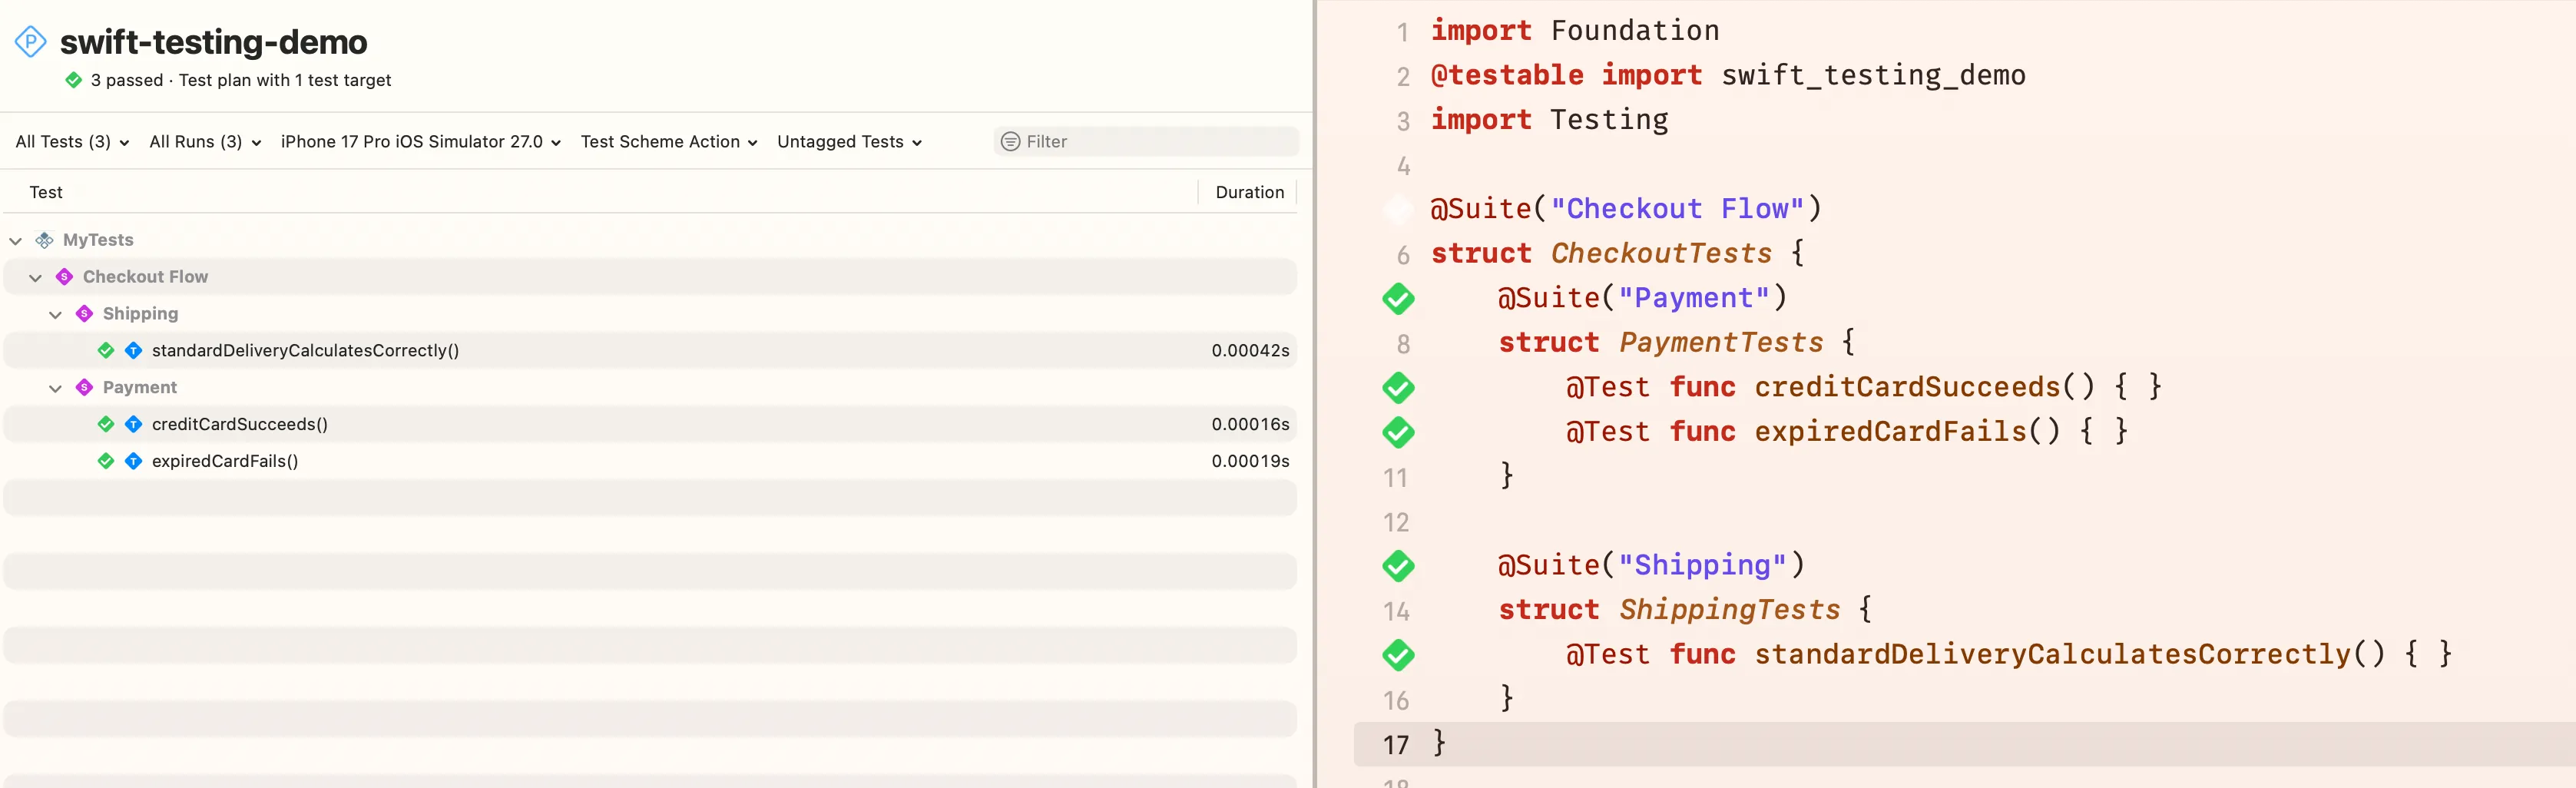
Nested Suites
You can nest suites inside suites to build a hierarchy:
@Suite("Checkout Flow")
struct CheckoutTests {

    @Suite("Payment")
    struct PaymentTests {
        @Test func creditCardSucceeds() { ... }
        @Test func expiredCardFails() { ... }
    }

    @Suite("Shipping")
    struct ShippingTests {
        @Test func standardDeliveryCalculatesCorrectly() { ... }
    }
}
Xcode’s test navigator mirrors this hierarchy, giving you a clean tree to navigate.
The #expect Macro
#expect is Swift Testing’s assertion primitive. You pass it any boolean expression, and it records a failure if that expression evaluates to false.
#expect(result == 42)
#expect(user.isLoggedIn)
#expect(items.count > 0)
What makes #expect special compared to XCTAssert is its failure message. When an assertion fails, Swift Testing does not just print “assertion failed”. It captures the full expression, evaluates each sub-expression, and shows you the actual values on both sides. For example, if result is 40, the failure message reads:
Expectation failed: (result → 40) == 42You see exactly what went wrong, without needing a custom message parameter in most cases.
Multiple Failures Per Test
#expect is non-throwing. If it fails, the test continues. This is deliberate. A single test can contain multiple #expect calls, and Swift Testing collects all failures before reporting. You see the complete picture in one run, rather than fixing one assertion at a time.
@Test
func userProfileIsPopulated() {
    let user = makeUser()

    #expect(user.name == "Ada")
    #expect(user.email == "ada@example.com")
    #expect(user.role == .admin)
}
If name and role are both wrong, both failures appear. In XCTest, the first XCTAssertEqual would stop the test entirely.
Asserting on Optionals
#expect works naturally with optional comparisons:
let found = repository.find(id: "123")
#expect(found?.name == "Ada")
If found is nil, the comparison evaluates to false and the test fails with a clear message.
Asserting That Code Throws
You can assert that a piece of code throws a specific error using the throws: overload:
await #expect(throws: AuthError.invalidCredentials) {
    try await authService.login(password: "wrong")
}
This passes only if the closure throws exactly AuthError.invalidCredentials. If it throws a different error, or throws nothing, the test fails. Note that matching a specific error value (rather than a type) requires your error to conform to Equatable. If AuthError is not Equatable, Swift Testing will not be able to compare the thrown value and the code will not compile.

You can always match on the type alone to sidestep this:
await #expect(throws: AuthError.self) {
    try await authService.login(password: "wrong")
}
To assert that any error is thrown without caring about the type:
#expect(throws: (any Error).self) {
    try riskyOperation()
}
To assert that code throws no error (the inverse):
#expect(throws: Never.self) {
    try validOperation()
}
The #require Macro
#require is #expect’s stricter cousin. When a #require check fails, it immediately throws an error and stops the test. Think of it as a guard, if a precondition is not met, there is no point running the rest of the test.
@Test
func fetchedUserHasCorrectName() async throws {
    let user = try await service.fetchUser(id: "123")
    try #require(user != nil) // stop here if nil

    #expect(user!.name == "Ada")
}
But the most common use of #require is unwrapping optionals safely:
@Test
func fetchedUserHasCorrectName() async throws {
    let rawUser = try await service.fetchUser(id: "123")
    let user = try #require(rawUser) // unwraps or fails immediately

    #expect(user.name == "Ada")
}
If rawUser is nil, try #require(rawUser) throws, the test stops, and Xcode marks it as failed with “Required value was nil”. If it is non-nil, user is the unwrapped value and the test continues.
#require With Throws
Just like #expect, #require has a throws: overload. The difference is that it also returns the thrown error so you can inspect it:
@Test
func wrongPasswordThrowsCorrectError() async throws {
    let error = try #require(throws: AuthError.self) {
        try authService.login(password: "wrong")
    }

    #expect(error == .invalidCredentials)
}
This is useful when you want to verify not just that an error was thrown, but also interrogate its associated values.
Traits
Traits are the configuration system for @Test and @Suite. They let you attach metadata, conditions, and behaviour modifiers to individual tests or entire suites. You pass them as additional arguments after the display name.
.disabled() — Skipping a Test
@Test(.disabled("Waiting on API contract to be finalised"))
func paymentWebhookHandling() { ... }
A disabled test appears in the test navigator as skipped. It is a much better signal than deleting the test or commenting it out. It documents why the test is not running and keeps the code in version control.
You can also disable at the suite level, which skips every test inside:
@Suite(.disabled("Feature flagged off in CI"))
struct BetaFeatureTests { ... }
.enabled(if:) — Conditional Tests
.enabled(if:) runs the test only when a condition is true at runtime:
@Test(.enabled(if: ProcessInfo.processInfo.environment["INTEGRATION_TESTS"] == "1"))
func stripeWebhookReachable() { ... }
This is perfect for tests that need a live network or a specific environment variable. In a unit-test-only CI lane, the test is skipped cleanly. In an integration lane where the flag is set, it runs.
.timeLimit() — Capping Test Duration
@Test(.timeLimit(.minutes(1)))
func largeFileUpload() async throws { ... }
If the test does not finish within the specified duration, Swift Testing marks it as failed. Use this to prevent a hanging async test from blocking your entire CI run.
.timeLimit can also be applied to a suite, capping every individual test inside it:
@Suite(.timeLimit(.seconds(30)))
struct NetworkTests { ... }
.serialized — Disabling Parallelism
By default, Swift Testing runs tests in parallel within a suite. .serialized forces them to run one after another:
@Suite(.serialized)
struct DatabaseMigrationTests {
    @Test func migrationV1() { ... }
    @Test func migrationV2() { ... }
    @Test func migrationV3() { ... }
}
Use
.serializedonly when tests genuinely depend on shared state that cannot be isolated, such as an in-process database that migrations modify sequentially. For pure unit tests, leave parallelism on.
Tags
Tags are a lightweight labelling system, and one of my favourite features. You define them as static properties on an extension of Tag, then attach them to tests and suites:
extension Tag {
    @Tag static var networking: Self
    @Tag static var auth: Self
    @Tag static var slow: Self
}
Attach them with the .tags() trait:
@Test(.tags(.networking, .slow))
func fetchesUserFromRemote() async throws { ... }

@Suite(.tags(.auth))
struct AuthenticationTests { ... }
From Xcode’s test navigator you can filter by tag and run only tests that share a label.
If you want to run only the specific sets of test in CI, you can run them from the command line
swift test --filter networkingTags are composable. A test can have multiple tags, and a tag on a suite is inherited by all tests inside it. This gives you a cross-cutting way to slice your test suite that does not depend on file or type hierarchy.
A Practical Tagging Strategy
A useful pattern is to tag tests by their category rather than their feature:
extension Tag {
    @Tag static var unit: Self
    @Tag static var integration: Self
    @Tag static var snapshot: Self
}
Your fast CI lane runs only unit. Your nightly lane runs everything. This is far cleaner than maintaining separate test targets ✌️
XCTestPlan: Putting Tags to Work
Defining tags in Swift code is only half the picture. The other half is telling Xcode which tagged tests to run, and when. That is exactly what XCTestPlan is for.
An XCTestPlan is a JSON file (extension .xctestplan) that lives inside your Xcode project. It stores one or more named configurations, each describing a different way to run your test suite, which tags to include or exclude, whether to randomize order, whether to measure coverage, which environment variables to inject, and so on. One target, many configurations.
Creating a Test Plan
In Xcode, open the scheme editor via Product > Scheme > Edit Scheme. Select the Test action in the left sidebar. If you have never used a test plan in this scheme, you will see a “Convert to use Test Plans…” button. Click it and Xcode generates a starter plan. If you want to add a second plan, click the + button at the bottom of the test plan list instead.
Save the file alongside your project. Once it exists, you manage it through the test plan editor rather than editing the JSON by hand. From that point on, running the test scheme runs the active test plan.
Anatomy of a Test Plan
Open the file in a text editor and you will see a structure like this:
{
  "configurations": [
    {
      "id": "6A3F2B10-...",
      "name": "Unit Tests",
      "options": {
        "codeCoverageEnabled": true,
        "randomExecutionOrderingEnabled": true
      }
    },
    {
      "id": "9D1C4E88-...",
      "name": "Integration Tests",
      "options": {
        "codeCoverageEnabled": false,
        "environmentVariableEntries": [
          { "key": "INTEGRATION_TESTS", "value": "1", "enabled": true }
        ]
      }
    }
  ],
  "defaultOptions": {
    "codeCoverageEnabled": true
  },
  "testTargets": [
    {
      "target": {
        "containerPath": "container:SwiftTestingDemo.xcodeproj",
        "identifier": "MyTests",
        "name": "MyTests"
      }
    }
  ],
  "version": 1
}
defaultOptions applies to every configuration unless a configuration overrides it. Individual configurations only need to specify the settings that differ from the defaults.
Filtering by Swift Testing Tags
This is where the tags you defined earlier pay off. In the test plan editor, select a configuration, then open the Tests tab (not the Options tab). Each test target listed there has a filter control. Click the filter icon next to your target and you will find the tag filtering UI, where you can add tags to an include list (run only these) or an exclude list (skip these).
For example, configure “Unit Tests” to require the unit tag and exclude slow and integration:
Configuration: "Unit Tests" > Tests tab > Filter on target
  Include tags:  unit
  Exclude tags:  slow, integration
And configure “Integration Tests” to include only integration:
Configuration: "Integration Tests" > Tests tab > Filter on target
  Include tags:  integration
Any test not carrying an included tag is skipped. Any test carrying an excluded tag is also skipped. The tag filter is stored per test target in the plan’s testTargets section; Xcode manages this part of the JSON for you through the editor.
Swift Testing’s tag inheritance means a tag on @Suite flows down to every @Test inside it, so you do not need to label each function individually.
CI Patterns that Work For Me 😄
There is no single “correct” test plan layout. The right configuration depends on what kind of team you are on and what phase of work you are in. Here are four patterns I have seen work well in practice.
Software House or Agency
Agencies juggle multiple client projects simultaneously, so the priority is fast feedback without blocking developers. Integration tests are expensive to maintain across many codebases, so they run only before delivery milestones, not on every push.
| Configuration | Required tags | Excluded tags | When to run |
|---|---|---|---|
| PR Check | unit | integration, slow, snapshot | Every PR, every commit |
| Pre-Delivery | integration | slow | Before client handoff or sprint review |
| Full Suite | (none) | (none) | Before final delivery or app store submission |
The key constraint here is developer time. A PR check that takes under two minutes keeps the agency’s pace up. The heavy stuff only runs when it genuinely matters.
Product Team (Long-Lived App)
A product team ships continuously to real users, so confidence matters more than raw speed. Tests are an investment, and the team can afford to run more of them more often.
| Configuration | Required tags | Excluded tags | When to run |
|---|---|---|---|
| Unit | unit | integration, slow | Every PR, every commit |
| Integration | integration | slow | Merge to main |
| Nightly | (none) | (none) | Nightly on main, pre-release branch |
The nightly run has no tag filters so it catches everything, including tests too slow to run on every PR. If nightly fails, the on-call engineer investigates before the next working day.
Refactoring or Updating an Existing Feature
When you are touching code that already exists in production, regression prevention is the entire point of your test suite. You want to run as much as possible, as often as possible, and be alerted the moment something breaks.
| Configuration | Required tags | Excluded tags | When to run |
|---|---|---|---|
| Regression | unit, integration | slow | Every commit on the feature branch |
| Full Regression | (none) | (none) | Before opening a PR |
Running both unit and integration tests on every local commit sounds heavy, but refactoring without that signal is essentially flying blind. The full regression sweep before the PR opens is the safety net that catches anything the frequent checks missed.
Greenfield Feature Development
When you are building something brand new, the code and the tests evolve together. Running integration tests early in this phase is wasteful because the APIs are still changing. Start narrow, then widen as the design stabilises.
| Phase | Configuration | Required tags | When to run |
|---|---|---|---|
| Early exploration | Discovery | unit | Every commit |
| API stabilised | Verification | unit, integration | Every PR |
| Ready to merge | Pre-Merge | (none) | Once, before merge to main |
The “Pre-Merge” run is intentionally a one-time gate, not a constant loop. You earn the right to run it by getting the feature to a stable enough state that the full suite is worth the wait.
Running a Configuration from the Terminal i.e From CI
Xcode’s xcodebuild respects test plans directly:
xcodebuild test \
  -scheme "MyApp" \
  -testPlan "Unit Tests" \
  -destination "platform=iOS Simulator,name=iPhone 16 Pro"
Change -testPlan "Integration Tests" and you get the integration lane. Your CI pipeline just passes a different string. No separate targets, no xcrun gymnastics, no duplicated scheme configurations.
Other Useful Configuration Options
Beyond tag filtering, the test plan editor exposes several options that make your suite more reliable.
Randomized execution order. Tests that happen to pass when run in alphabetical order can hide ordering dependencies. Randomizing forces each test to be truly independent.
"randomExecutionOrderingEnabled": trueRetry on failure. Genuinely flaky tests, especially integration tests hitting real services, can be retried automatically before being counted as failures. This reduces false-negative noise in CI without hiding real bugs.
"testRepetitionMode": "retryOnFailure",
"maximumTestRepetitions": 3
Use this sparingly. If a unit test needs retries, it is probably hiding a concurrency bug that needs fixing, not retrying.
Environment variables per configuration. Inject different base URLs, feature flags, or API keys for each lane without changing source code:
"environmentVariableEntries": [
  { "key": "API_BASE_URL", "value": "https://staging.example.com", "enabled": true },
  { "key": "FEATURE_NEW_CHECKOUT", "value": "1", "enabled": true }
]
Your production code reads ProcessInfo.processInfo.environment["API_BASE_URL"] and the test plan handles the rest.
Code coverage. Enable it per configuration so your unit-test lane reports coverage while your integration lane skips it (integration tests tend to produce misleading coverage numbers):
"codeCoverageEnabled": trueConnecting Everything
With Swift Testing tags and a test plan in place, your workflow looks like this:
- Write tests, attach tags (
@Test(.tags(.unit)),@Suite(.tags(.integration))) - Tag on the suite propagates to every test inside automatically
- The test plan picks up those tags and routes each test to the right configuration
- CI calls
xcodebuild -testPlan "Unit Tests"on every PR andxcodebuild -testPlan "Integration Tests"nightly - You never manually maintain a list of which tests to skip or include
The test plan file is checked into version control alongside your code. When a new test is added with the right tag, it automatically appears in the right CI lane. No configuration drift, no stale exclusion lists.
Parameterised Tests
Parameterised tests are one of Swift Testing’s most powerful features. Instead of copy-pasting the same test ten times with different inputs, you pass a collection of arguments and Swift Testing creates one test case per element.
Single Collection
@Test("Validates all supported currency codes", arguments: ["USD", "EUR", "GBP", "JPY"])
func validatesCurrencyCode(code: String) {
    #expect(CurrencyValidator.isValid(code))
}
Swift Testing generates four separate test cases: one for "USD", one for "EUR", and so on. Each case appears independently in the navigator and can be run or re-run individually. If "GBP" fails, you run only that case to debug, without re-running the others.
Two Independent Collections (Cartesian Product)
When you pass two separate collections, Swift Testing generates every combination:
@Test(
    "All payment methods work with all currencies",
    arguments: [PaymentMethod.card, .applePay, .payPal],
             ["USD", "EUR", "GBP"]
)
func paymentMethodWithCurrency(method: PaymentMethod, currency: String) async throws {
    let result = try await checkout.process(method: method, currency: currency)
    #expect(result.isSuccess)
}
This produces 9 test cases (3 methods × 3 currencies). Be careful with Cartesian products. They grow fast and can bloat your suite if overused.
Zipped Collections (Paired Arguments)
If you want paired arguments instead of every combination, use zip:
@Test(
    "Each error code maps to the correct message",
    arguments: zip(
        [400, 401, 403, 404],
        ["Bad Request", "Unauthorised", "Forbidden", "Not Found"]
    )
)
func errorCodeMapsToMessage(code: Int, message: String) {
    #expect(HTTPError(code: code).localizedDescription == message)
}
zip pairs the first element of each collection together, the second together, and so on. No Cartesian product.
Parameterised Tests Anti Pattern 🚨
Parameterised tests are a great fit when
- You have a list of known valid/invalid inputs to verify
- You are testing a mapping or transformation over a fixed set of values
They become an anti-pattern when
- Each case has meaningfully different setup or assertions
- You are using them to avoid writing properly named tests that express clear intent
If the test body needs an if argument == specificValue branch, split it into separate tests.
Keep Your Test Bodies Dumb
This is the rule that parameterised tests make easy to violate, a test body should contain zero logic.
No if statements. No loops. No computed expected values. Just a call and an assertion against a hardcoded result. This is very important. Trust me folks, I have seen smart engineers pushed smart test cases, and a few months later, those tests become counterintuitive and a main source of cognitive workload.
The moment your test body gets “smart”, you have a problem. Consider this
// Bad: the test has logic in it
@Test("Discount is applied correctly", arguments: ["SAVE10", "SAVE20", "SAVE50"])
func discountIsApplied(code: String) {
    let rate = code == "SAVE10" ? 0.10 : code == "SAVE20" ? 0.20 : 0.50
    let expected = 100.0 * (1 - rate)
    cart.apply(code: code)
    #expect(cart.total == expected)
}
This test has a bug risk of its own. If the ternary chain is wrong, the test will happily pass while verifying the wrong thing. You would need to test the test.
The fix is to move the expected value into the arguments, keeping the body completely passive:
// Good: the body is dumb, all knowledge lives in the arguments
@Test(
    "Discount is applied correctly",
    arguments: zip(
        ["SAVE10", "SAVE20",  "SAVE50"],
        [90.0,     80.0,      50.0]
    )
)
func discountIsApplied(code: String, expectedTotal: Double) {
    cart.apply(code: code)
    #expect(cart.total == expectedTotal)
}
Now the test body is two lines with no branching. The expected values are hardcoded, obvious, and impossible to get wrong silently. Anyone reading the arguments table immediately understands all three cases without mentally executing the logic.
Though the above statement is very much relevant to the parameterised tests, the same rule applies to non-parameterised tests as well. A test that computes its expected value from the same formula as the production code is not testing anymore. It is just running the code twice and checking that it agrees with itself. Expected values in tests should be literals you arrived at independently, not derived from the code under test.
Async and Throws Support
Just like you’ve seen several times throughout this blog post, Swift Testing handles async functions and throwing functions naturally. Mark your test function with async, throws, or both, and Swift Testing wraps the execution automatically.
@Test
func fetchesCurrentUser() async throws {
    let user = try await userService.currentUser()
    #expect(user.id == "me")
}
No XCTestExpectation, no waitForExpectations. The test simply awaits, and Swift Testing drives the async context for you.
Async Sequences
For code that produces multiple values over time, you can iterate directly:
@Test
func streamEmitsThreeValues() async throws {
    var received: [Int] = []

    for await value in counter.stream().prefix(3) {
        received.append(value)
    }

    #expect(received == [1, 2, 3])
}
Confirmation: Verifying That Events Occur
Sometimes the code under test fires callbacks, publishes values, or sends notifications asynchronously. #expect cannot catch those because you would need to observe them from the outside. That is what confirmation is for.
confirmation creates a Confirmation object you pass into the code under test. The code under test calls confirm() when the expected event occurs. After the closure finishes, Swift Testing verifies that confirm() was called exactly the expected number of times.
@Test
func loginPublishesSuccessEvent() async throws {
    try await confirmation { confirmed in
        authService.onLoginSuccess = { confirmed() }
        try await authService.login(email: "ada@example.com", password: "correct")
    }
}
If onLoginSuccess is never called, the test fails with “Confirmation was not confirmed”.
Expecting Multiple Confirmations
Pass expectedCount: when the event should fire more than once:
@Test
func uploadProgressFiresThreeTimes() async throws {
    try await confirmation(expectedCount: 3) { confirmed in
        uploader.onProgress = { _ in confirmed() }
        try await uploader.upload(file: largeFile)
    }
}
expectedCount is an Int and the check is exact. If confirm() is called fewer or more times than specified, the test fails.
withKnownIssue — Documenting Expected Failures
This become more relevant for developers building SDKs or libraries. Some failures are real bugs you intend to fix, but fixing them now is out of scope. withKnownIssue lets you mark a block as expected to fail without making the entire test fail.
@Test
func parserHandlesEmojiInUsernames() {
    withKnownIssue("Parser crashes on emoji — tracked in issue #482") {
        let result = parser.parse("user🚀name")
        #expect(result != nil)
    }
}
If the block fails (as expected), the test is marked with a warning icon, not a red failure. If the block passes (meaning the known issue was fixed), Swift Testing reports an unexpected success so you remember to remove the withKnownIssue wrapper.
This is a big improvement over
XCTExpectFailure. The intent is explicit in the code, tracked in version control, and the framework actively reminds you when the issue is resolved.
Intermittent Known Issues
You can be more precise about which failure you expect by marking it as intermittent:
withKnownIssue(isIntermittent: true) {
    // This test is flaky, known to fail occasionally
    #expect(flakeyService.ping())
}
An intermittent known issue does not require the block to fail every time. It simply suppresses the failure when it occurs.
Test Lifecycle with init and deinit
When your test suite needs setup and teardown, use a struct with init and deinit. Each @Test function gets a fresh instance, so init and deinit run once per test automatically
struct UserServiceTests {
    let service: UserService
    let fakeRepo: FakeUserRepository

    init() {
        fakeRepo = FakeUserRepository()
        service = UserService(repository: fakeRepo)
    }

    @Test
    func createsUser() async throws {
        let user = try await service.create(name: "Ada")
        #expect(fakeRepo.find(id: user.id) != nil)
    }
}
For asynchronous setup, use an async init:
struct DatabaseTests {
    let db: TestDatabase

    init() async throws {
        db = try await TestDatabase.inMemory()
        try await db.migrate()
    }

    deinit {
        db.close()
    }
}
This pattern replaces setUp() and tearDown() from XCTest cleanly. (In fact, I hardly ever used those, I am mostly content with my makeSut helper function as it is more predictable IMHO.) Because each test gets its own instance, there is no risk of state leaking between tests.
Actor Isolation
Swift Testing integrates with Swift’s actor system. You can isolate a suite to a specific actor, including @MainActor:
@Suite
@MainActor
struct ViewModelTests {
    @Test
    func titleUpdatesAfterFetch() async {
        let vm = FeedViewModel()
        await vm.load()
        #expect(vm.title == "Latest Posts")
    }
}
When @MainActor is applied to the suite, every @Test inside runs on the main actor. This is useful for testing ViewModels or any type that is @MainActor-isolated, without needing to scatter await MainActor.run { } everywhere.
You can also conform your suite to a custom global actor
@globalActor
actor DatabaseActor { static let shared = DatabaseActor() }

@Suite
@DatabaseActor
struct PersistenceTests { ... }
Custom Traits (Advanced)
When the built-in traits are not enough, you can define your own by conforming to TestTrait (for individual tests) or SuiteTrait (for suites). A custom trait can carry arbitrary data, run setup/teardown code, or modify test behaviour.
A Practical Example: Network Stubbing Trait
Suppose you want a trait that stubs the network before each test and tears it down afterwards:
struct NetworkStubTrait: TestTrait, TestScoping {
    func provideScope(
        for test: Test,
        testCase: Test.Case?,
        performing function: @Sendable () async throws -> Void
    ) async throws {
        NetworkStubber.activate()
        defer { NetworkStubber.deactivate() }
        try await function()
    }
}

extension Trait where Self == NetworkStubTrait {
    static var stubbedNetwork: Self { NetworkStubTrait() }
}
Now you can apply it like any built-in trait
@Test(.stubbedNetwork)
func fetchesUserFromStubbedAPI() async throws {
    NetworkStubber.stub(url: "/users/me", response: User.fixture)
    let user = try await api.currentUser()
    #expect(user.name == "Ada")
}
Custom traits that conform to TestScoping wrap the test execution, making them the right tool for cross-cutting concerns like stubbing, database seeding, or feature flag overrides.
Putting It All Together: A Full Example
Here, I took the liberty to sketch out a simple test suite for a CartService that uses most of the concepts covered above
import Testing

extension Tag {
    @Tag static var cart: Self
    @Tag static var integration: Self
}

@Suite("Cart Service", .tags(.cart))
struct CartServiceTests {
    let cart: CartService
    let fakeInventory: FakeInventoryRepository

    init() {
        fakeInventory = FakeInventoryRepository()
        cart = CartService(inventory: fakeInventory)
    }

    // MARK: - Adding Items

    @Test("Adding an item increases the item count")
    func addingItemIncreasesCount() throws {
        // Given
        fakeInventory.stock["SKU-001"] = 10

        // When
        try cart.add(sku: "SKU-001", quantity: 2)

        // Then
        #expect(cart.itemCount == 2)
    }

    @Test("Adding more than available stock throws an error")
    func addingExcessiveQuantityThrows() {
        fakeInventory.stock["SKU-001"] = 1

        #expect(throws: CartError.insufficientStock) {
            try cart.add(sku: "SKU-001", quantity: 5)
        }
    }

    // MARK: - Discounts (Parameterised)

    @Test(
        "Discount codes reduce the total correctly",
        arguments: zip(
            ["SAVE10", "SAVE20", "SAVE50"],
            [0.10,     0.20,     0.50]
        )
    )
    func discountCodeReducesTotal(code: String, rate: Double) throws {
        fakeInventory.stock["SKU-001"] = 10
        try cart.add(sku: "SKU-001", quantity: 1)
        cart.applyDiscount(code: code)

        let basePrice = fakeInventory.price(for: "SKU-001")
        #expect(cart.total == basePrice * (1 - rate))
    }

    // MARK: - Checkout (Async + Confirmation)

    @Test("Checkout publishes an order confirmed event", .tags(.integration))
    func checkoutPublishesEvent() async throws {
        fakeInventory.stock["SKU-001"] = 10
        try cart.add(sku: "SKU-001", quantity: 1)

        await confirmation { confirmed in
            cart.onOrderConfirmed = { _ in confirmed() }
            try await cart.checkout(paymentToken: "tok_test")
        }
    }

    // MARK: - Known Issue

    @Test("Empty cart checkout returns a validation error")
    func emptyCartCheckoutFails() async {
        withKnownIssue("Empty cart validation not yet implemented, issue #91") {
            #expect(throws: CartError.emptyCart) {
                try cart.checkout(paymentToken: "tok_test")
            }
        }
    }
}
This single file demonstrates display names, tags, init-based setup, parameterised tests with zip, async confirmation, withKnownIssue, and both #expect and #expect(throws:). If you want to have a Cheatsheet for Swift Testing, I have launched a Swift Testing Reference for you.
Swift Testing and Objective-C
TLDR; Swift Testing is a Swift-only framework. Every API in it — @Test, @Suite, #expect, #require, tags, traits, confirmation, withKnownIssue — is built on Swift macros and Swift language features. None of them are available in .m files.
If your codebase still has Objective-C test files, those must remain as XCTestCase subclasses using the XCTAssert* family. That is not a crisis. XCTest and Swift Testing are designed to coexist in the same test target, running side by side without conflict.
Testing Objective-C Code from Swift Testing
Here is the important distinction: the test framework must be Swift, but the code being tested can be Objective-C.
Swift can import and call any Objective-C API through the bridging header, so a @Test function written in Swift can exercise Objective-C classes, methods, and delegates directly:
// Testing an Objective-C class from a Swift Testing test
import Testing
@testable import MyApp // lowers internal Swift access; ObjC types are accessible via the module

@Test("Legacy formatter produces the expected string")
func legacyFormatterOutput() {
    let formatter = LegacyDateFormatter() // Objective-C class
    let result = formatter.format(Date(timeIntervalSince1970: 0))
    #expect(result == "Jan 1, 1970")
}
No changes to the Objective-C code are needed. The test author writes Swift, calls into ObjC, and uses Swift Testing’s full API. This is the recommended migration path: leave the Objective-C code in place, and write new tests for it in Swift using Swift Testing.
Why @Test Cannot Be Used in Objective-C
XCTest discovers tests at runtime by inspecting the Objective-C method list: any method prefixed with test on a class that inherits XCTestCase is a test. Swift Testing works differently. It uses compiler-generated metadata produced at build time by the @Test macro. That metadata is a Swift construct with no Objective-C equivalent, so the runtime reflection trick XCTest relies on does not apply.
The consequence is that @Test functions do not need to be @objc, do not need a test prefix, and do not need to be in a class at all — but they cannot live in a .m file.
The Practical Migration Strategy
For a codebase with a mix of Swift and Objective-C test files, the pragmatic path forward is
- Leave existing ObjC tests alone.
XCTestCasesubclasses keep running. Do not rewrite them for the sake of it 😅 - Write all new tests in Swift, even if the code under test is Objective-C. Use Swift Testing from day one for all new test files.
- Migrate ObjC test files opportunistically. When you touch a test file to add new cases or fix a bug, rewrite that file in Swift at the same time.
- Never mix
@TestandXCTestCasein the same file. A file is either one or the other.
Over time, hopefully, the ObjC test files naturally shrink. The Swift Testing suite grows. At some point the last .m test file disappears on its own.
Conclusion
Swift Testing makes the right patterns easy. The @Test macro removes boilerplate. #expect shows you exactly what failed. Tags and test plans let you shape CI lanes to match how your team actually works, whether you are at an agency shipping client builds or a product team merging to main every day.
The framework is still relatively young, and the community has been filling in gaps. In the next part we will look at what third-party libraries bring to the table: snapshot testing, richer diffing, property-based testing, and how to integrate them cleanly alongside what we built here.
Comments are powered by Giscus (GitHub Discussions). Loading them fetches resources from GitHub.